MSI Megabook S271: a Look at AMD's Turion X2
by Jarred Walton on October 16, 2006 12:05 AM EST- Posted in
- Laptops
Internals and Construction
We mentioned that the system we originally received was essentially the base model, and since we really wanted to look at Turion X2 performance potential we had to perform some upgrades. That gave us a chance to tear open the system and see how it was put together.
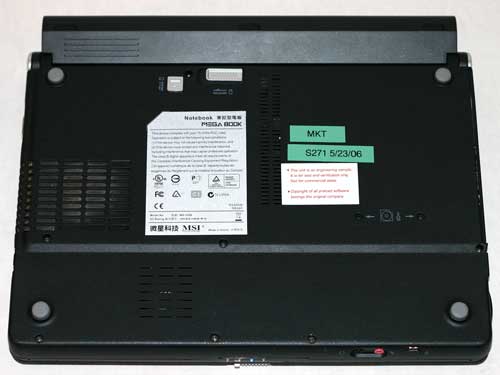
One of the first major issues we have with the design becomes immediately apparent when you decide to make even the simplest upgrade. The vast majority of laptops include a small access panel on the bottom of the system that allows you to upgrade memory. Unfortunately, other than the battery latch and some ventilation, there really isn't much to see on the bottom of the laptop. If you want to add memory, you will have to pop the hood, and as with most laptops this requires removing several screws -- six to be exact. As is typical of most laptops, you will need a small Phillips head screwdriver in order to accomplish this.
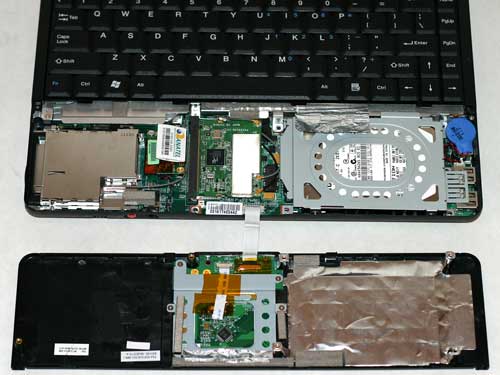
With the screws on the bottom removed, you should be able to use your fingers to pry open the front of the case. We found it was easiest to start at the left front corner, and then work your way around to the front right corner. Once this is done, you can carefully lift off the front plastic panel which includes the trackpad.
This piece is connected to the rest of the system by a ribbon cable, so be careful not to lift/pull it too far until you detach the cable. If you are working on a flat surface, you don't actually need to detach the ribbon cable, which is one less step to worry about if all you're trying to do is upgrade memory or hard drive.
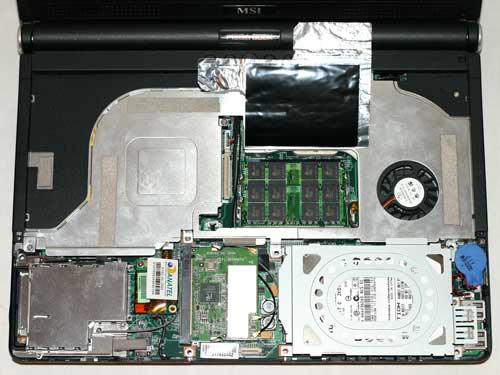
At this point, you can lift the keyboard up, exposing access to the memory slots. The keyboard is also attached by a ribbon cable, and if you don't need to do more than swap/add memory you should be able to do this without detaching the cable. Just be careful not to pull on the ribbon cable too much, as they can be damaged. We removed the cable and keyboard completely in order to get a good shot of the memory slots, which are covered by a thin sheet of foil/insulator. In the above picture, we have two Corsair 1GB SO-DIMMs installed. If you wanted to upgrade your hard drive, one more screw secures the drive bay, and once you remove that you can lift the drive out.
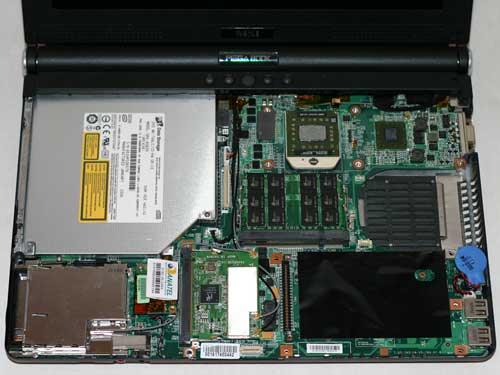
Getting down to the CPU requires a bit more work. First you have to remove the large plastic and aluminum panel. This is secured by one more screw on the bottom rear of the chassis and seven screws on the top of the panel. You also need to remove the hard drive in order to remove this panel. Once you have all the screws removed, you have to pry up the plastic sides in a manner similar to how you first open the case, and then slide the panel up and out. It takes a bit of effort, but if you find that any portions of the panel seem to be stuck check again and make sure you have removed all of the necessary screws.
With that panel out of the way, you can see the relatively large heatsink, heatpipe, and fan assembly that cools the processor, chipset, and some of the voltage regulators. There are actually only four screws holding the heatsink in place, all in the top left portion in a rectangular arrangement. The screws won't actually come all the way out as they are connected to the heatsink, so all you have to do is loosen them and then carefully lift/pry off the cooling assembly.
When you got all that done, it's pretty easy to remove the old processor and install a new processor. We did have to scrape off the old thermal pad before installing the new processor, as it had become hard and would likely have caused issues with cooling the processor. We used some inexpensive thermal paste when we installed the TL-60 (and later when switching back to the TL-50), and in subsequent testing we didn't notice any substantial difference in temperatures or stability. Once you've installed the new processor, reverse the whole process to put the system back together and you're done.
Here's a quick shot of all the pieces you will have won the system is completely disassembled. This is a picture of the bottom of all these components, since we already had various images of the tops. All told, the disassembly and upgrade process was one of the more inconvenient laptops we've dealt with, but as most people will only have to do this once or twice during their ownership of the laptop it shouldn't present too big a problem. However, given that we were testing several different configurations and had to disassemble and reassemble the system quite a few times, we grew to be none too fond of the overall design.
Besides the requirement that you take apart the front of the system just to swap memory, we encountered some problems with the wireless mini-PCI card, likely caused by our poking around inside the case. When the laptop first arrived, the wireless networking worked fine (once we got the proper drivers installed). After our first "upgrade", Windows wireless networking could no longer find our network. After a lot of trial and error, we determined that we must have bumped the card or wires in some fashion that affected the ability for the card to receive signals. We checked the connections and everything looked fine, but the WiFi networking still refused to work. We opened up the laptop again and played around with the card and the connections a bit more, turned the system back on, and the wireless network was back.
Unfortunately, it seemed every time we opened the case there was a good chance that the wireless network would fail, and eventually we reached the point where we were unable to get the wireless adapter to function anymore. Windows didn't indicate any problems other than the inability to see any networks, so most likely it was simply some point of failure in the WiFi antenna that runs throughout the chassis or on the card itself. We have used other laptops that also include bottom panel access to the mini-PCI slot, and it certainly seems that there are better locations than MSI chose, although it is also possible that we just got a flaky wireless networking card in our review unit. Our overall impression of the RALINK wireless networking card is lackluster at best, and we also discovered at one point when the card was working that the latest drivers had a severe memory leak. Thankfully, you don't have to use the RALINK networking application.
We mentioned that the system we originally received was essentially the base model, and since we really wanted to look at Turion X2 performance potential we had to perform some upgrades. That gave us a chance to tear open the system and see how it was put together.
One of the first major issues we have with the design becomes immediately apparent when you decide to make even the simplest upgrade. The vast majority of laptops include a small access panel on the bottom of the system that allows you to upgrade memory. Unfortunately, other than the battery latch and some ventilation, there really isn't much to see on the bottom of the laptop. If you want to add memory, you will have to pop the hood, and as with most laptops this requires removing several screws -- six to be exact. As is typical of most laptops, you will need a small Phillips head screwdriver in order to accomplish this.
 |
| Click to enlarge |
With the screws on the bottom removed, you should be able to use your fingers to pry open the front of the case. We found it was easiest to start at the left front corner, and then work your way around to the front right corner. Once this is done, you can carefully lift off the front plastic panel which includes the trackpad.
 |
| Click to enlarge |
This piece is connected to the rest of the system by a ribbon cable, so be careful not to lift/pull it too far until you detach the cable. If you are working on a flat surface, you don't actually need to detach the ribbon cable, which is one less step to worry about if all you're trying to do is upgrade memory or hard drive.
 |
| Click to enlarge |
At this point, you can lift the keyboard up, exposing access to the memory slots. The keyboard is also attached by a ribbon cable, and if you don't need to do more than swap/add memory you should be able to do this without detaching the cable. Just be careful not to pull on the ribbon cable too much, as they can be damaged. We removed the cable and keyboard completely in order to get a good shot of the memory slots, which are covered by a thin sheet of foil/insulator. In the above picture, we have two Corsair 1GB SO-DIMMs installed. If you wanted to upgrade your hard drive, one more screw secures the drive bay, and once you remove that you can lift the drive out.
 |
| Click to enlarge |
Getting down to the CPU requires a bit more work. First you have to remove the large plastic and aluminum panel. This is secured by one more screw on the bottom rear of the chassis and seven screws on the top of the panel. You also need to remove the hard drive in order to remove this panel. Once you have all the screws removed, you have to pry up the plastic sides in a manner similar to how you first open the case, and then slide the panel up and out. It takes a bit of effort, but if you find that any portions of the panel seem to be stuck check again and make sure you have removed all of the necessary screws.
 |
| Click to enlarge |
With that panel out of the way, you can see the relatively large heatsink, heatpipe, and fan assembly that cools the processor, chipset, and some of the voltage regulators. There are actually only four screws holding the heatsink in place, all in the top left portion in a rectangular arrangement. The screws won't actually come all the way out as they are connected to the heatsink, so all you have to do is loosen them and then carefully lift/pry off the cooling assembly.
 |
| Click to enlarge |
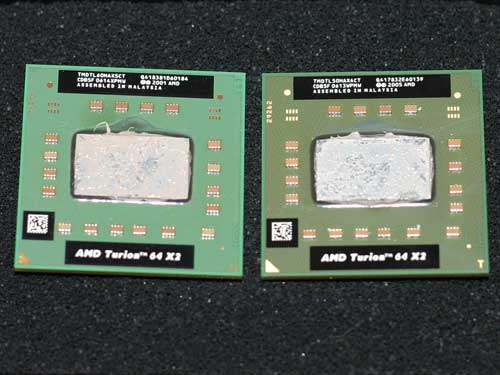
When you got all that done, it's pretty easy to remove the old processor and install a new processor. We did have to scrape off the old thermal pad before installing the new processor, as it had become hard and would likely have caused issues with cooling the processor. We used some inexpensive thermal paste when we installed the TL-60 (and later when switching back to the TL-50), and in subsequent testing we didn't notice any substantial difference in temperatures or stability. Once you've installed the new processor, reverse the whole process to put the system back together and you're done.
 |
| Click to enlarge |
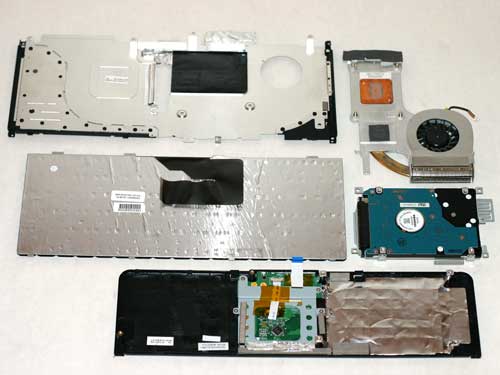
Here's a quick shot of all the pieces you will have won the system is completely disassembled. This is a picture of the bottom of all these components, since we already had various images of the tops. All told, the disassembly and upgrade process was one of the more inconvenient laptops we've dealt with, but as most people will only have to do this once or twice during their ownership of the laptop it shouldn't present too big a problem. However, given that we were testing several different configurations and had to disassemble and reassemble the system quite a few times, we grew to be none too fond of the overall design.
Besides the requirement that you take apart the front of the system just to swap memory, we encountered some problems with the wireless mini-PCI card, likely caused by our poking around inside the case. When the laptop first arrived, the wireless networking worked fine (once we got the proper drivers installed). After our first "upgrade", Windows wireless networking could no longer find our network. After a lot of trial and error, we determined that we must have bumped the card or wires in some fashion that affected the ability for the card to receive signals. We checked the connections and everything looked fine, but the WiFi networking still refused to work. We opened up the laptop again and played around with the card and the connections a bit more, turned the system back on, and the wireless network was back.
Unfortunately, it seemed every time we opened the case there was a good chance that the wireless network would fail, and eventually we reached the point where we were unable to get the wireless adapter to function anymore. Windows didn't indicate any problems other than the inability to see any networks, so most likely it was simply some point of failure in the WiFi antenna that runs throughout the chassis or on the card itself. We have used other laptops that also include bottom panel access to the mini-PCI slot, and it certainly seems that there are better locations than MSI chose, although it is also possible that we just got a flaky wireless networking card in our review unit. Our overall impression of the RALINK wireless networking card is lackluster at best, and we also discovered at one point when the card was working that the latest drivers had a severe memory leak. Thankfully, you don't have to use the RALINK networking application.


31 Comments
View All Comments
Cehtna - Tuesday, October 24, 2006 - link
You take one Acer Ferrari 5000 and a TravelMate 8210, and you benchmark them!These are both made by Acer and the battery and chassis are exactly the same and other features should also be the same..
They both come in variants with:
ATIX1600 - 256MB/512MB HyperMemory GRAPHICS
15,4" TFT WSXGA+ (1680x1050) MONITR
1024MB DDR2 MEMORY
120GB SATA HDD
Lithium 9 cells BATTERY
This way its;
LX.TEH06.017 TravelMate 8215WLMi with
Intel Centrino 2 Duo T7200 CPU
Mobile Intel® 945PM Express CHIPSET
versus;
LX.FR50J.016 Ferrari 5002WLMi with
Turion64 2X TL50 CPU
ATI Xpress 1150 CHIPSET
JarredWalton - Tuesday, November 14, 2006 - link
Thanks... now just get Acer to send me both for review! Oh, wait... that's not as easy to accomplish, is it? I would love to review more laptops, with more variation among configurations. However, the simple fact of the matter is that we have to review what we are sent in most cases.I certainly don't make enough money to go out and buy laptops that I want to review, and a lot of companies don't necessarily want to have us do a head-to-head among their computing laptops. What happens if laptop X seriously trounces laptop Y and they both cost about the same amount?
In the end, most people purchase laptops within their price range, so if AMD offers cheaper laptops, some people will buy those laptops whether or not they are faster. Those who want better performance are generally going to pay for more expensive laptops, and in that market that AMD laptops really don't compete very well right now.
etee - Friday, November 24, 2006 - link
AMEN to that. I bet HP, MSI (or any other company that makes value notebooks) doesn't want to see a performance review between their $550 and $1000 notebooks whose only difference is +200Mhz CPU, +40GB HDD, +1GB RAM.... If the public saw the lack of perf. improvement for the money, they'd never buy the $1000 notebook. Too bad discrete graphics hasn't become standard on the mainstream midrange $1000 notebooks yet. That might actually would justify the price.I also found that this review was all over the place and really didn't do a good job of isolating the variables that led to various performance indicators.
How do we quantify the value of the discrete GFX of the ASUS notebook? Certainly system perf. would be significantly improved just because we don't have UMA graphics hogging up the system memory bandwidth. I think the intel notebook should have featured UMA graphics for comparison.
I understand that the notebook makers won't hook you up with samples of all of their offerings. That doesn't mean that the only option is to cover the ASUS and MSI side by side. It would be better to compare a single system with various components upgraded. You can't get every model of notebook from MSI, but you can make your own "models" with upgraded CPUs, RAM, HDDs, batteries and try to generate an approximate price for such a model. If we did this separately for the MSI and ASUS, then the reader can be left to decide what suites them better for a given price. At the very least we wouldn't be trying to compare apples to oranges.
abakshi - Tuesday, October 17, 2006 - link
Honestly, I found this review pretty useless. Forgoing the fact that other sites have actually done comparisons of the 271 with its Core Duo couterpart (the S270, if I recall), it still doesn't offer much.Obviously an IGP solution will be much slower than a Geforce Go 7700. I think most people who are going to read and interpret your graphs know that. But why must everyone have a a GF7700? Integrated graphics at the level of the current ATI chipsets are a good step up from what the vast majority of Intel-powered laptops come with, which is Intel's GMA junk.
The article constantly refers to the ATI IGP as a huge drawback to the machine, implying that the competition has something better. Which other 12" portable has discrete graphics, besides the (heavier, not quite ultraportable) Dell XPS M1210? In fact, I'd argue the widespread use of ATI IGPs is a strength of the AMD platform - the Radeon Xpress chips are far better for everyday usage (from multimedia playback to general performance) than the Intel GMA950 chips. And unlike the GMA chips, R-X200/1150 will run Win Vista's Aero Glass interface and most modern 3D apps very comfortably.
The other problem, related to the point on IGPs, is the focus on gaming. Who plays 3D games on a 12", <5 lbs. laptop? Aren't things like battery life and heat output far more important in this setting than how many FPS it can get in Half-Life 2? Why is there any stress at all on gaming? The almost nonexistent ultraportable gaming market is clearly not the target audience for this machine.
The review even goes to the point of suggesting that mid-level discrete graphics chips like the ATI Mobility Radeon X1400 are inadequate. Something like an X1400 is more than adequate for the vast majority of users. It will run every common 3D function (like Aero Glass) and will even run relatively recent 3D games decently. Ever hear of battery life? Not everyone needs to get 60 FPS while playing Half-Life 2 on their miniscule screen in the train.
So for example, I play games -- but for that, I have my desktop rig at home, with a dual-core A64 X2 4400+ (ironically now probably outperformed by my laptop's Core 2 Duo @ 2.0) and an ATI Radeon X1800XT 512. I'm currently using a Dell E1705 as my primary laptop, with an ATI MR X1400 GPU, which is great - it's solid (with consistently updated and universally compatible ATI drivers, unlike Intel junk), currently running dual-boot Win XP MCE and Vista RC1, and gets far better battery life than versions with more powerful GPUs (NV 7900GS, GTX, etc.).
IntelUser2000 - Wednesday, October 18, 2006 - link
Exactly. Then who cares whether you have a slow integrated card or a SLOWER one. The point of most IGP reviews are to see whether any people who plays latest 3D games will bother with the IGP for their 3D games.
0.1 to 0.2. Nobody will care.
There are no direct comparisons of GMA and R1150 testings on Win Vista's Aero Glass. They are both certified, so they can both run it that's for sure.
Intel also has unified drivers and updated drivers for their IGP. 845G to G965. Of course the drivers aren't up to par as ATI based ones, but considering ATI's specialty, its expected.
I'd say then having GMA950 will be more important for battery life than R1150 then. Because R1150 is more fully featured, and will waste unnecessary battery life.
Final point is: the review isn't perfect, but there aren't many better Turion X2 laptops either. Anandtech happened to review the ones they got in hand.
That's the problem with laptop reviews, it isn't as vast as the desktop ones, but that's little out of scope.
JarredWalton - Tuesday, October 17, 2006 - link
Did you get hung up on page 10? That was there merely to point out that the IGP solutions CAN'T play modern games. End of story. A couple quotes:The point of the article isn't comparing IGP performance; we took exactly one page to clearly show that IGP is inadequate for gaming, and if you don't play games it largely won't matter. A "focus on gaming" would be more what we had in the http://www.anandtech.com/mobile/showdoc.aspx?i=274...">XPS M1710 review, where we did spend a lot of time on that subject as anyone buying a $3500 notebook with high-end graphics will probably want to make use of them! Oh yeah, I also talked about the advantages of an http://www.anandtech.com/mobile/showdoc.aspx?i=276...">E1705 with X1400 in another article.
Most notebooks with GMA950 run everything they need to without problems. GMA950 will run Aero Glass I believed (slower than Xpress 1100 but again, that's probably not a concern of anyone looking at budget systems). To say that Xpress 1100 can "run Win Vista's Aero Glass interface and most modern 3D apps very comfortably" is simply not true. It can run them, and perhaps Aero Glass will be fine; modern 3D apps choke on X300SE type hardware. I will worry about fully benchmarking/testing Vista on laptops when it actually ships, but I've read that Aero Glass may kill battery life. :|
hondaman - Monday, October 16, 2006 - link
After upgrading to the new bios from MSI that made the laptop stable, did you try the generic ram again to see if it fixed it?JarredWalton - Monday, October 16, 2006 - link
Yup, still no POST. Should have known better than to buy Gigaram. Heh. Still, it will make for a nice "worst case" test of other notebooks. If a laptop can boot with the Gigaram, it can probably boot with just about anything! That or the SO-DIMM is just bad, which is always a possibility.Patrese - Monday, October 16, 2006 - link
Have you guys seen a huge ANATEL sticker inside the notebook? It is from the Agência Nacional de Telecomunicações, the regulatory agency of telecomunications here in Brazil. Kinda funny to see that on a notebook meant to be sold in the US market, as I have never seen one of these in any PC or notebooks sold in Brazil... :)randomas - Monday, October 16, 2006 - link
I would really like to see a Linux test using 64bit distribution and a 32bit distribution on the same machine and then compare it to an Intel machine, which if I'm correct still doesn't support x86_64 instructions on its portable line of cpus.Seeing the results of the 64 vs 32 bit Linux tests already published here on Anandtech it would make for interesting reading, especially as IMHO this machine has a strong appeal for Linux users who can take advantage of its full potential.
Personally I own a MSI M635 (turion mt34 atix700) which I'm very happy with.